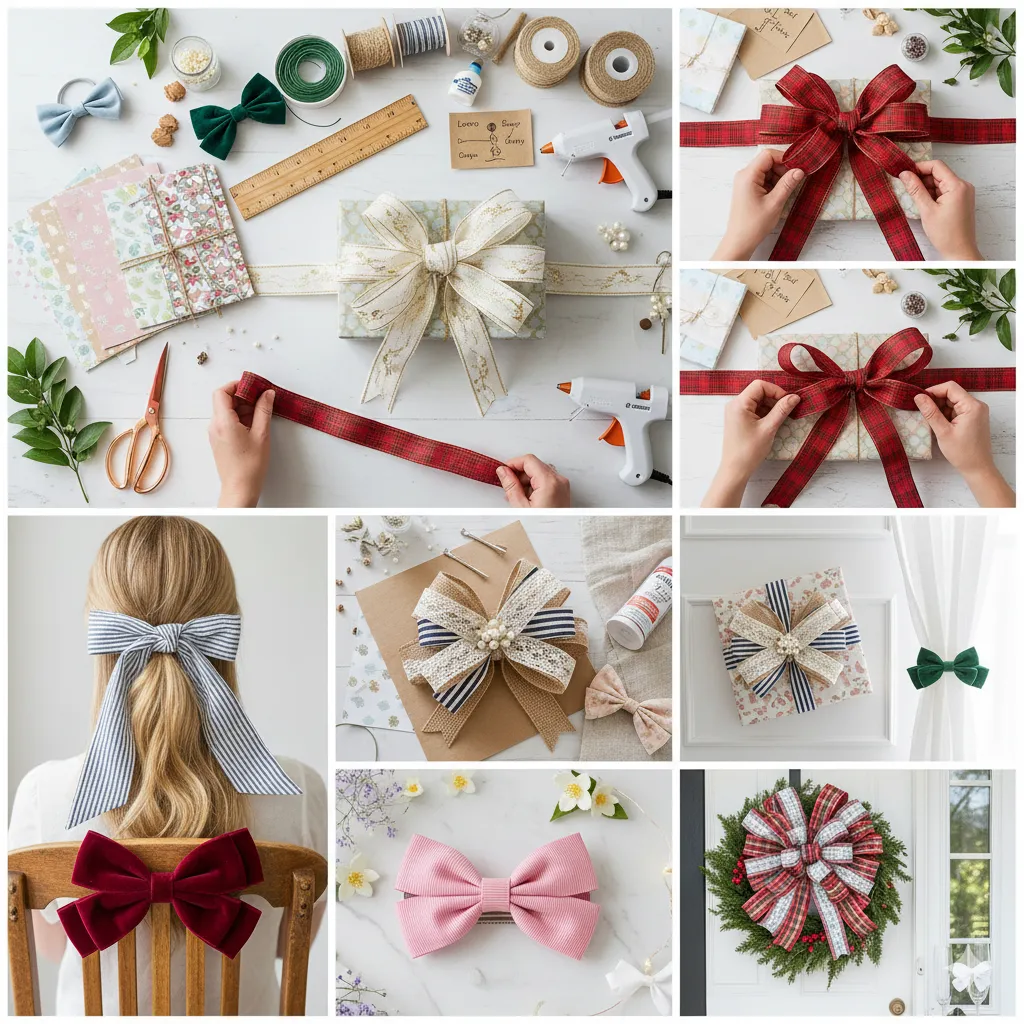
Have you noticed? Bows are absolutely everywhere right now. They’ve totally shed their “grandma’s Christmas tree” vibe and become the chicest, most versatile accessory going. We’re talking gorgeous satin bows tied to the straps of dresses, velvet bows adorning sleek ponytails, oversized, fluffy fabric bows replacing traditional wrapping paper, and of course, the stunning, layered DIY wreath bow that makes your front door look like a Pinterest board come to life.
I’m not going to lie, for years I thought making a truly impressive, professional-looking bow was some kind of arcane art reserved for high-end florists. My bows always looked a little… sad and lopsided. I bet you’ve been there, too! But seriously, with a few clever tricks and the right materials, you can create a stunning bow for any occasion.
Today, we’re going to dive headfirst into the glorious world of loops and tails. Forget the limp, single-knotted struggles of the past. I promise you’ll walk away from this easy bow tutorial knowing exactly how to make a bow—not just one way, but multiple methods using ribbon, paper, fabric, and more. Consider this your definitive, visual DIY bow tutorial and your personal printable bow guide, all rolled into one friendly chat. Ready to get started?
1. Bow Basics — What You’ll Need to Get Loopy
Before we start folding and tying, let’s get our little crafting station in order. You don’t need a massive, dedicated craft room (though, IMO, that’s the dream!), but a few key tools and materials will make your life so much easier. Think of this section as gathering your ingredients before attempting that fancy soufflé.
Essential Tools for Bow Making
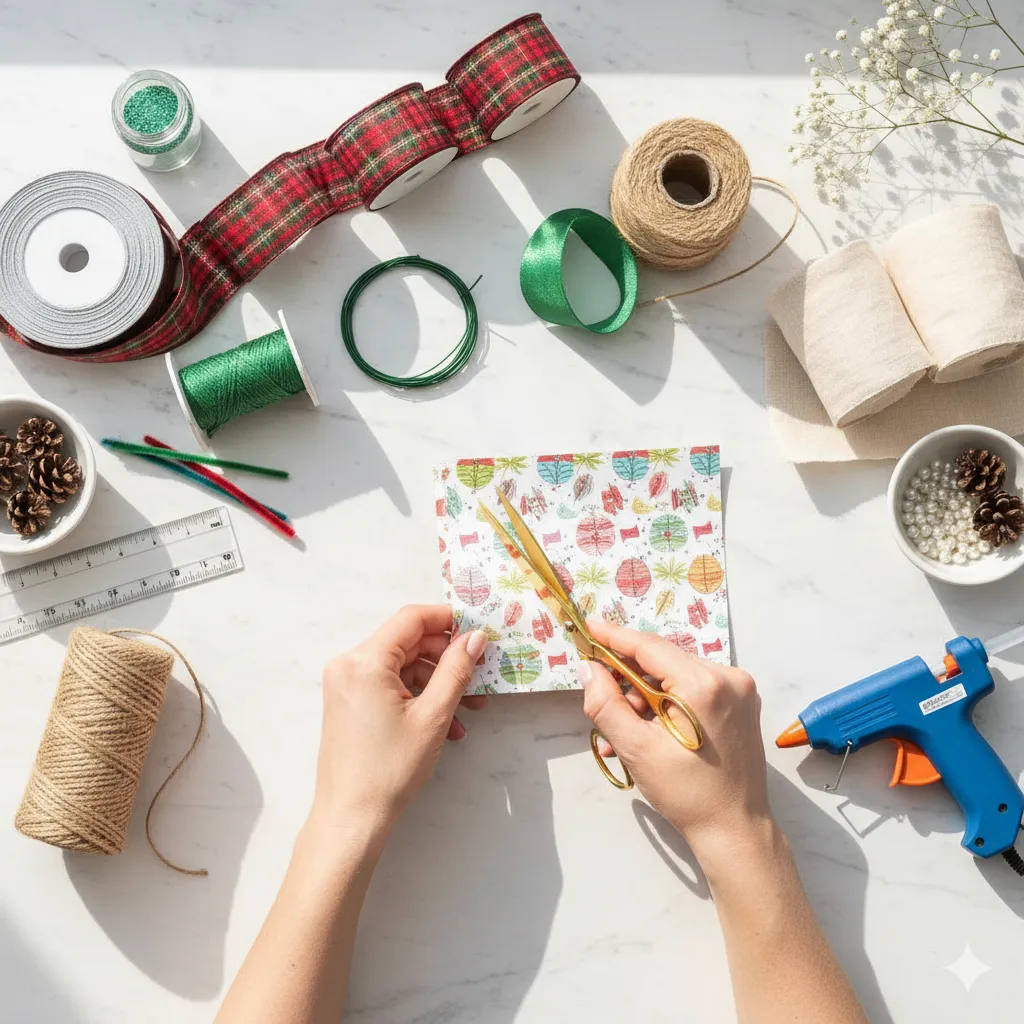
Honestly, you probably have most of this stuff lurking in a drawer already. Don’t overthink it!
- Sharp Scissors: This is non-negotiable. Nothing ruins a beautiful bow faster than ragged edges from dull scissors. Treat yourself to a sharp pair just for fabric and ribbon.
- Floral Wire or Pipe Cleaners: For securing the center of your bow, especially those big, fluffy wreath monsters. A little wire is the secret sauce for a tight center and easy attachment.
- Ruler or Measuring Tape: Crucial for making sure your loops and tails are symmetrical. Because we aren’t aiming for the “abstract expressionist” bow look, right?
- Glue (Optional but Handy): Hot glue gun for a quick, strong hold, especially on decorative items. Fabric glue for no-sew fabric bows.
Materials: The Fun Stuff
This is where you get to unleash your inner texture-and-color addict. You can make a bow out of nearly anything that holds a crease!
- Ribbon: The classic choice. We’ll talk about this more in a sec.
- Paper: Scrapbook paper, Kraft paper, even old maps or book pages! Great for a quick, eco-friendly gift topper.
- Fabric: Cotton scraps, luxurious velvet, crisp linen. Perfect for hair bows and farmhouse décor.
- Twine or Jute: For a rustic, minimalist touch.
- Embellishments: Think beads, lace, mini pinecones, or glitter.
Choosing Your Ribbon: Width, Stiffness, and Sheen
Choosing the right ribbon is literally half the battle. If you pick the wrong kind, you’ll be fighting with it the whole time, and who needs that stress?
- Width: Wider ribbons (1.5–2.5 inches) make bigger, more dramatic loops—perfect for wreaths and gifts. Thin ribbon (1/4–1/2 inch) is best for hair or small accents.
- Stiffness: The wired ribbon is your best friend, FYI. That little wire edge lets you literally mold and shape the loops into perfect poufs that hold their shape indefinitely. Non-wired satin or grosgrain is great for simple knots and drapes, but shaping is harder.
- Sheen: Do you want high-drama satin or velvet for a holiday bow? Or a matte, natural linen or cotton for a farmhouse vibe? Match the ribbon’s vibe to your project.
Bow Anatomy: The Three-Part Harmony
Every great bow has three main parts. If you know what they are, you’ll be able to follow any ribbon bow tutorial.
- Loops: These are the rounded parts—the ears of the bow. You can have one (a simple knot), two (the classic look), or dozens (for a fluffy, stacked bow).
- Tails: The pieces of ribbon that hang down from the bottom. These add a nice drape and visual interest. Cut the ends into a “V” shape or a diagonal to prevent fraying and make them look polished.
- Center Knot/Center Loop: The piece that cinches the whole thing together. This is either a simple knot or a small piece of ribbon wrapped around the middle to hide the mechanics (like the wire).
2. How to Make a Bow with Ribbon: The Classic Method
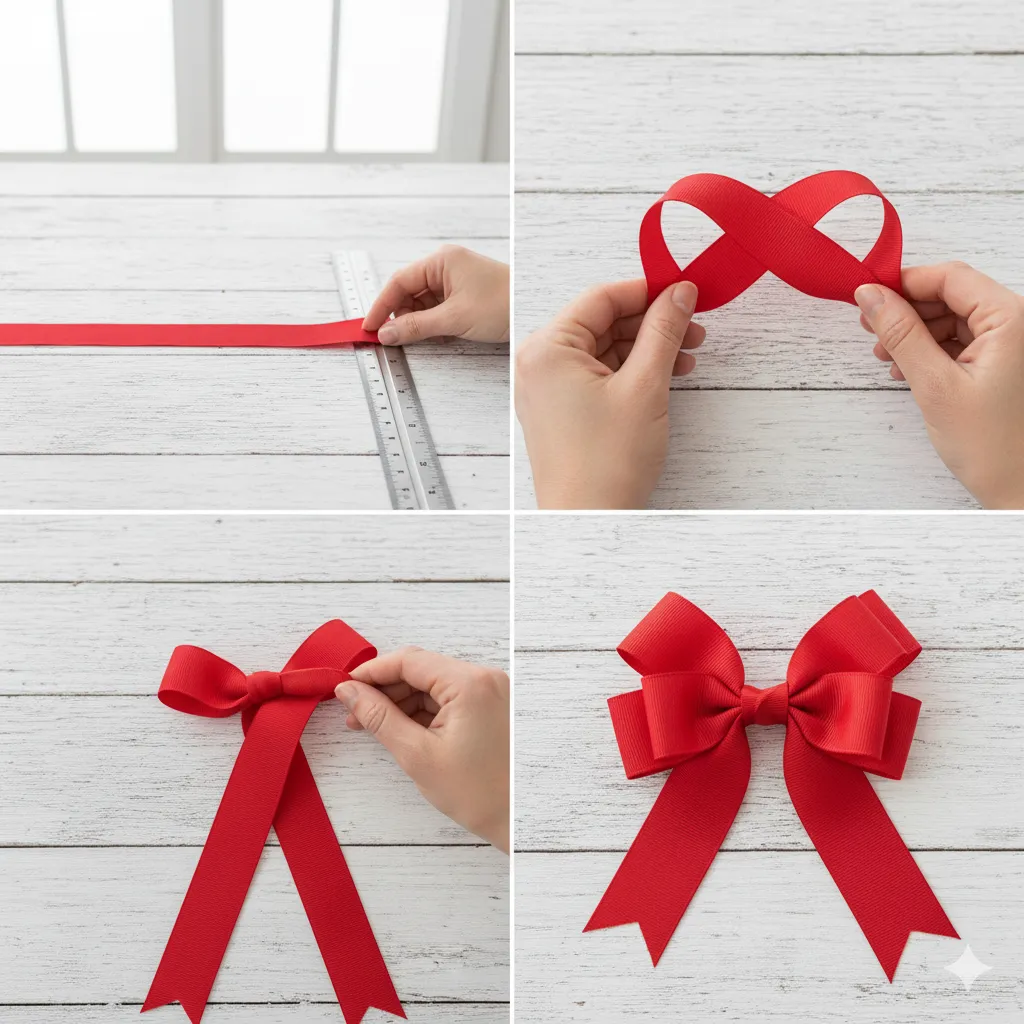
This is the technique that makes a beautiful, classic double-loop ribbon bow. Once you nail this, you can apply it to nearly any ribbon type!
Step-by-Step for a Classic Ribbon Bow
This is often called the “bunny ear” method, but for grown-ups who are aiming for slightly more sophisticated results.
- Measure and Start: Cut a generous length of ribbon—a safe starting point for a medium bow is about 2-3 feet, depending on the width. You can always trim the tails later, but you can’t add more!
- Form the Loops: Hold the ribbon with the right side facing out. Create two even loops, one on the left and one on the right, making sure the loops are the exact same size. This symmetry is everything, so eyeball it and adjust.
- Crossover: Cross the right loop over the left loop, just like you start tying your shoelaces.
- Knot and Cinch: Tuck the right loop up through the hole created by the crossover. Pull the loops tight to cinch the center. Don’t worry if it looks a little messy right now; you just need a secure center knot.
- Fluff and Shape: This is the magic part, especially if you’re using wired ribbon. Gently pull and twist the loops until they are perfectly shaped and the center knot is hidden.
Variations on a Theme
Once you master the basic knot, you can easily adapt it for different styles.
- The Double-Loop Ribbon Bow: This is what we just made! It’s the perfect size for a standard gift or a small décor accent.
- The No-Tie Bow: Use the same method to form your loops, but instead of knotting, cinch the center tightly with a piece of floral wire and secure the center with a small, separate strip of ribbon using hot glue. This is my go-to for how to make a big bow for gifts because the center stays flat!
- The Wired Ribbon Bow: When you are fluffing the classic bow, twist the wired edges into sharp creases and curves. They will stand up beautifully, giving the bow a volume that flat ribbon simply can’t achieve. This is a crucial Pinterest saveable tip for anyone serious about their bow game!
3. How to Make a Bow Out of Ribbon: Getting Crafty
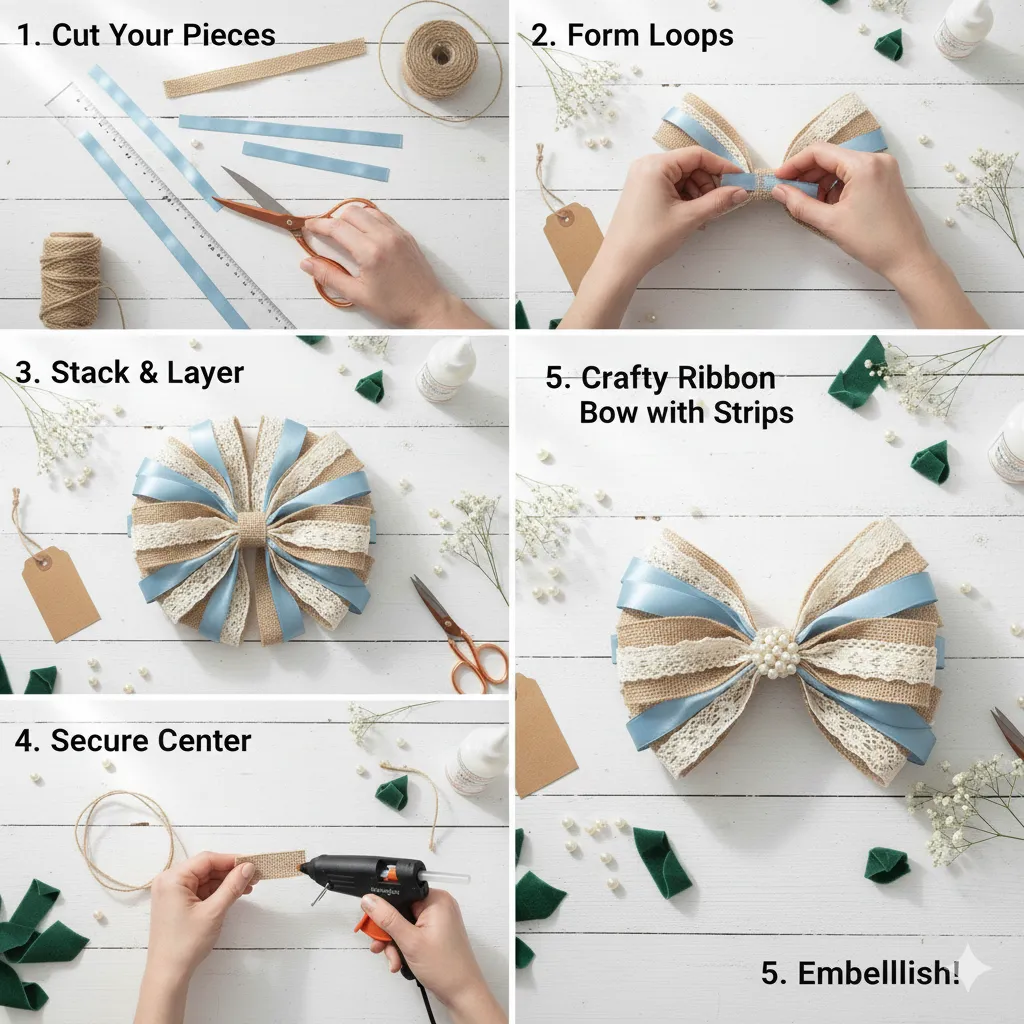
This section is all about getting crafty and embracing the decorative side of bow making. This approach works better for gift wrapping or party décor because it allows for more interesting shapes and bow stacking.
Creating a Crafty Ribbon Bow with Strips
Instead of working with a continuous piece of ribbon, we’re going to work with individual strips. This makes a super neat, symmetrical, and full bow.
- Cut Your Pieces: For a medium bow, you’ll need three to five pieces of ribbon cut into different lengths. For example, two strips at 10 inches (these will be your top loops), two at 12 inches (bottom loops), and one small 3-inch piece (the center loop).
- Form the Loops: Take each strip and twist it to form a loop, overlapping the ends in the center. Secure that center point with a tiny dab of hot glue or a staple. You now have a pile of figure-eights.
- Stack and Layer: Starting with the longest loops, stack them on top of each other, rotating each layer slightly to make the loops point in different directions. Glue each layer to the one below it.
- The Center: Take your smallest piece of ribbon and wrap it tightly around the entire center stack. Secure it with a little hot glue at the back.
- Embellish! Now for the fun part! Glue small pearls, miniature lace flowers, or tiny velvet scraps into the center of the bow for extra textural oomph.
This layering technique is what gives you that beautiful bow stacking look you see everywhere on high-end wrapping. It’s truly a game-changer!
4. How to Make a Bow with Paper: Eco-Friendly & Fabulous
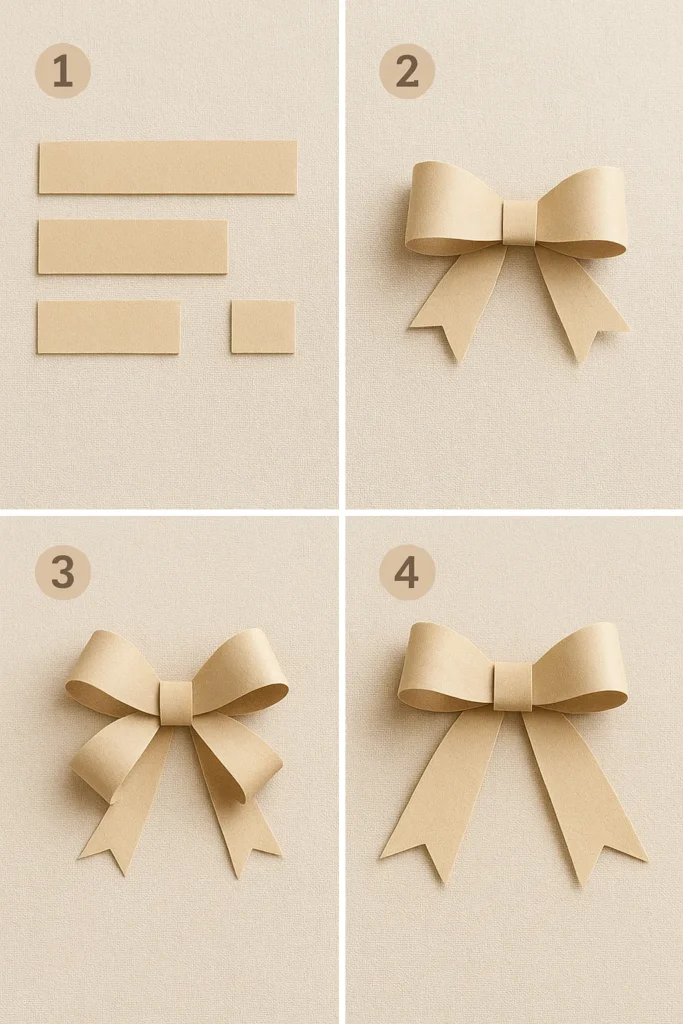
Looking for a last-minute gift-wrap solution or a charming, eco-friendly topper? A paper bow is your answer. They look crisp, professional, and are perfect for a flat lay photo shoot (Pinterest tip: paper bows photograph beautifully against a neutral background like natural wood or linen).
Step-by-Step: The Layered Paper Bow
This is a flat paper bow that pops up into a chic 3D shape.
- Cut the Strips: Cut three different lengths of paper into strips (1-1.5 inches wide). You’ll need three long strips, three medium strips, and one short strip. You’ll also need one small rectangle for the center.
- Make the Loops: Take each strip and fold it into a loop, bringing the ends to the center so they overlap. Unlike ribbon, you’ll want to cut a slight curve into the paper at the center to make the join neat. Secure the ends to the center with a strong adhesive or double-sided tape.
- Assemble: Start with your longest loops, laying them out in a star shape. Glue them at the center. Layer the medium loops on top, slightly offset from the first layer. Then, add the three small loops.
- The Center: Curl your tiny paper rectangle slightly and glue it right on top to hide the messy center joins.
- Add Tails (Optional): You can cut two separate paper strips and notch the ends for tails, gluing them to the back of the bow before attaching it to your package. This easy paper bow craft is also super fun for kids to do!
5. How to Make a Bow with Fabric: Soft and Chic
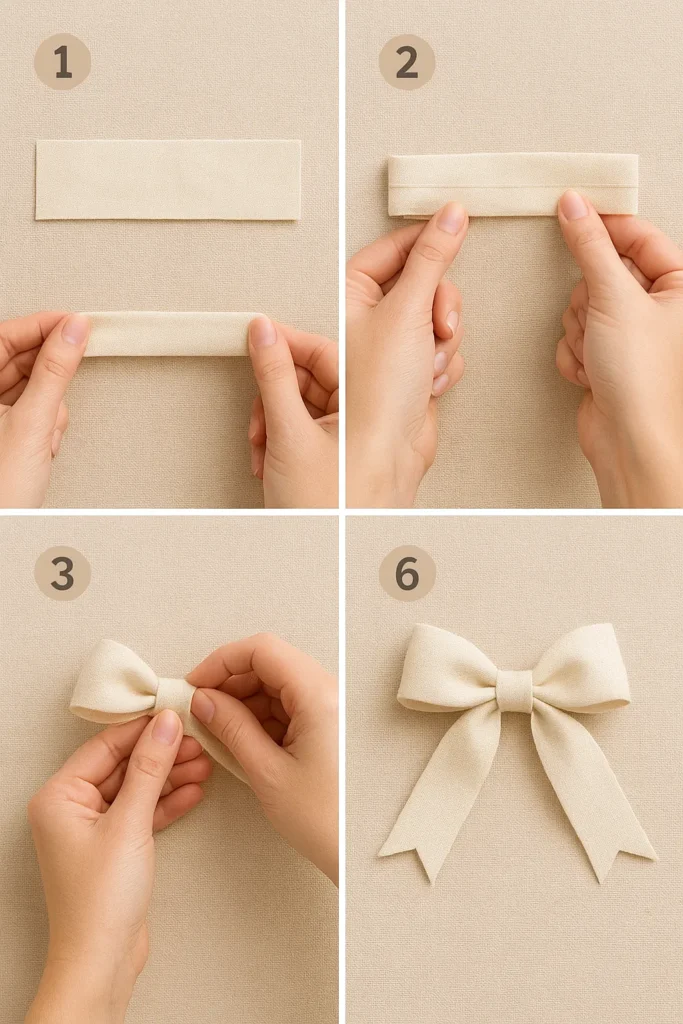
A fabric bow adds a beautiful, soft texture that a paper or even ribbon bow just can’t replicate. It’s perfect for a farmhouse fabric bow look, an elegant hair accessory, or upcycling those fabric scraps you just can’t bear to throw away.
Turning Scraps into Chic Bows
- Cut the Fabric: Cut a rectangular strip of fabric. For a small hair bow, aim for about 10 x 4 inches. The bigger you go, the longer and wider your strip needs to be.
- Hem the Edges (Optional but Recommended): To prevent fraying, especially with cotton or linen, either fold and stitch the raw edges or use a product like Fray Check. For a more polished look, you can machine-stitch the strip into a long tube and turn it right side out.
- The Simple Tie: Simply tie the fabric strip into a classic shoelace knot. Because fabric is softer, this knot will lie beautifully flat.
- The Stiffening Trick: Want a crisp, structured bow? Iron your fabric using heavy-duty spray starch before you tie or stitch it. For even more structure (like for a boutique-style hair bow), iron thin interfacing onto the back of the fabric strip.
- Usage Ideas: Use luxurious velvet for holiday table décor, or crisp cotton prints for a little extra detail on a handmade gift. These are also ideal for turning into hair accessories by gluing them onto a barrette or elastic tie.
6. How to Make a Bow for a Wreath: Going Big or Going Home
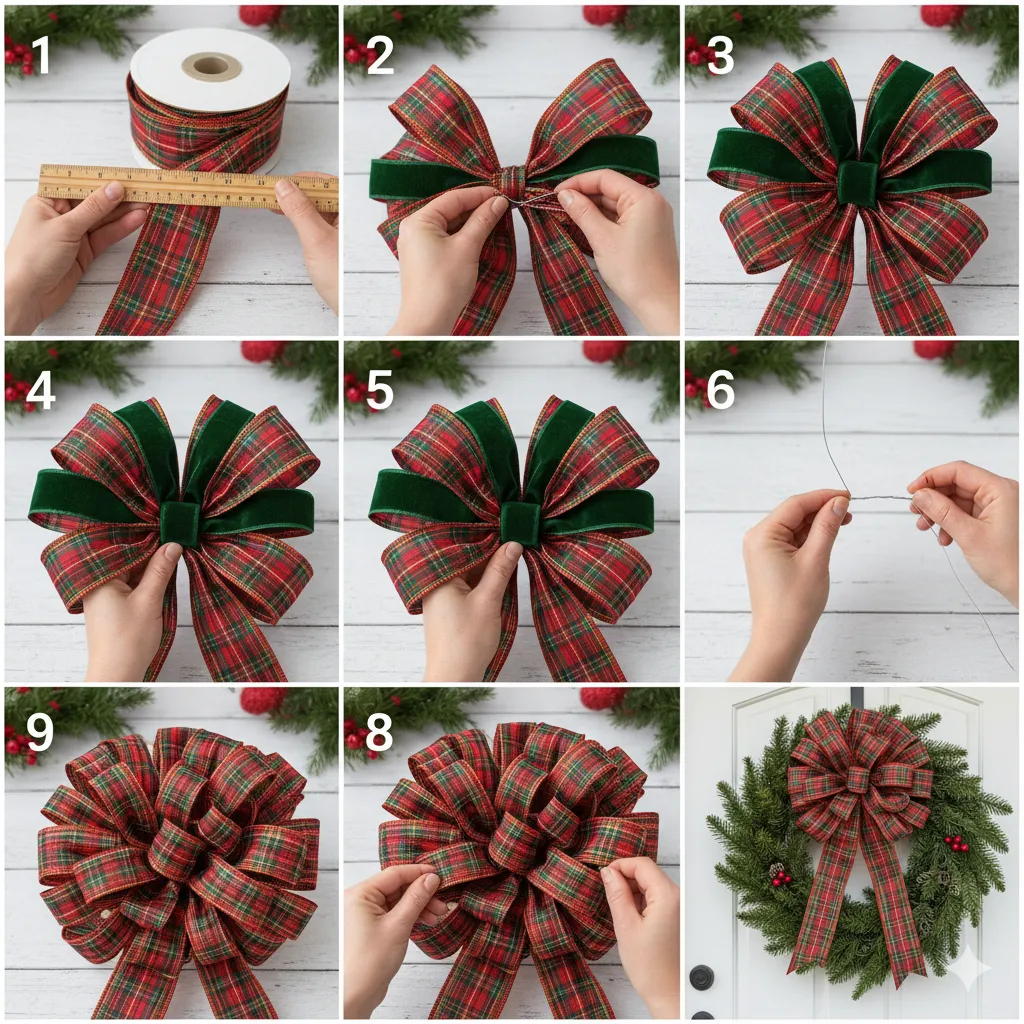
This is the big leagues. Wreaths demand a bow that has presence, volume, and staying power against the elements. A great DIY wreath bow is the centerpiece of your door décor.
Step-by-Step for a Large Wired Wreath Bow
You absolutely, positively must use wired ribbon for this—preferably a heavy-duty, outdoor-friendly type. Two different ribbon patterns work magic here.
- Measure the Ribbon: Don’t be shy with the ribbon. For a full, 12-inch wreath, plan to use at least 4 to 6 yards. We are aiming for a fluffy bow here!
- Create the Loops: Starting with the tail, pinch the ribbon firmly between your thumb and forefinger (this is your center). Twist the ribbon so the “right” side always faces out. Loop the ribbon away from the center, back toward the center, and pinch. Repeat this to create a loop on the other side.
- Layer and Pinch: Continue creating loops, adding a new layer on top of the first. Each new loop should be slightly smaller than the one before it to create a nice, tiered look. You should have 4-6 loops on each side, all pinched tightly at the center.
- Secure the Center: While still pinching, take a long piece of floral wire and wrap it tightly around the pinched center. Twist the wire on the back to secure it. Leave the wire ends long; you’ll use these to attach the bow.
- Fluff and Shape: This is the most satisfying part! Using the wire in the ribbon, gently pull, twist, and separate each loop until the bow is perfectly round and full. If you used two types of ribbon, make sure both are visible.
- Attach: Use the long wire ends to thread the bow through the greenery and twist them securely around the wreath frame. Don’t just attach it to a branch; attach it to the wire frame for stability!
Seasonal versions are easy: use plaid and deep greens for Christmas, pastels and florals for spring, and deep oranges and burlap for fall.
7. Simple & Advanced Bow Techniques
You’ve learned the basics, so let’s quickly review the major bow types and touch on some slightly more advanced techniques to take your craft to the next level.
Basic Bow Types Recap
- Single-Loop Bow (Simple Knot): Perfect for a quick, minimal touch on a package or a ponytail.
- Double-Loop Bow (Classic Bunny Ear): The standard, go-to bow for gifts and décor.
- Layered/Stacked Bow: Created with separate strips of ribbon/paper for a full, professional-looking centerpiece.
Advanced Bow Techniques
- The Fluffy Bow (aka The Floral Bow): This is the wreath bow technique we just covered. It requires many loops, all cinched by a single wire in the center. The key is twisting the ribbon at the center pinch every time you create a loop.
- Bow Stacking: This technique is a major Pinterest trend and simply involves using multiple ribbons of different widths, colors, and textures and layering them on top of one another (like we did in the “Crafty” section).
- Boutique-Style Hair Bow: Often made with crisp grosgrain ribbon, this bow uses a little extra stitching or gluing to create defined, sharp creases for a super tailored look.
Troubleshooting: When Things Go Wrong :/
We all have those moments when a bow looks more like a strangled butterfly than a perfect pouf. Here’s what’s usually wrong:
- Uneven Loops: This happens when you don’t measure or eyeball your loops carefully before you tie or cinch the center. A quick fix? If you used wire, just gently pull one loop from the center to even it out.
- Floppy Bows: Your ribbon is too flimsy or too narrow for the size of the bow. You need a stiffer ribbon or you need to back it with interfacing (for fabric) or wire (for ribbon).
- Messy Centers: If your center knot is bulky, you need to hide it! Wrap a thin, separate strip of ribbon around the center and hot glue it at the back. Crisis averted!
8. Bow Styling & Display Ideas
You’ve mastered how to make a bow—now what? A beautiful bow deserves to be shown off! Think beyond the standard gift box.
Creative Ways to Use Your Bows
- Gifts: Ditch the pre-made stick-on bows and use a layered paper or crafted ribbon bow tutorial creation instead. It immediately elevates the wrapping to a piece of art.
- Hairstyles: A small velvet or satin bow tied to the end of a braid or a simple ponytail adds an instant dose of elegance and is one of the biggest trends right now.
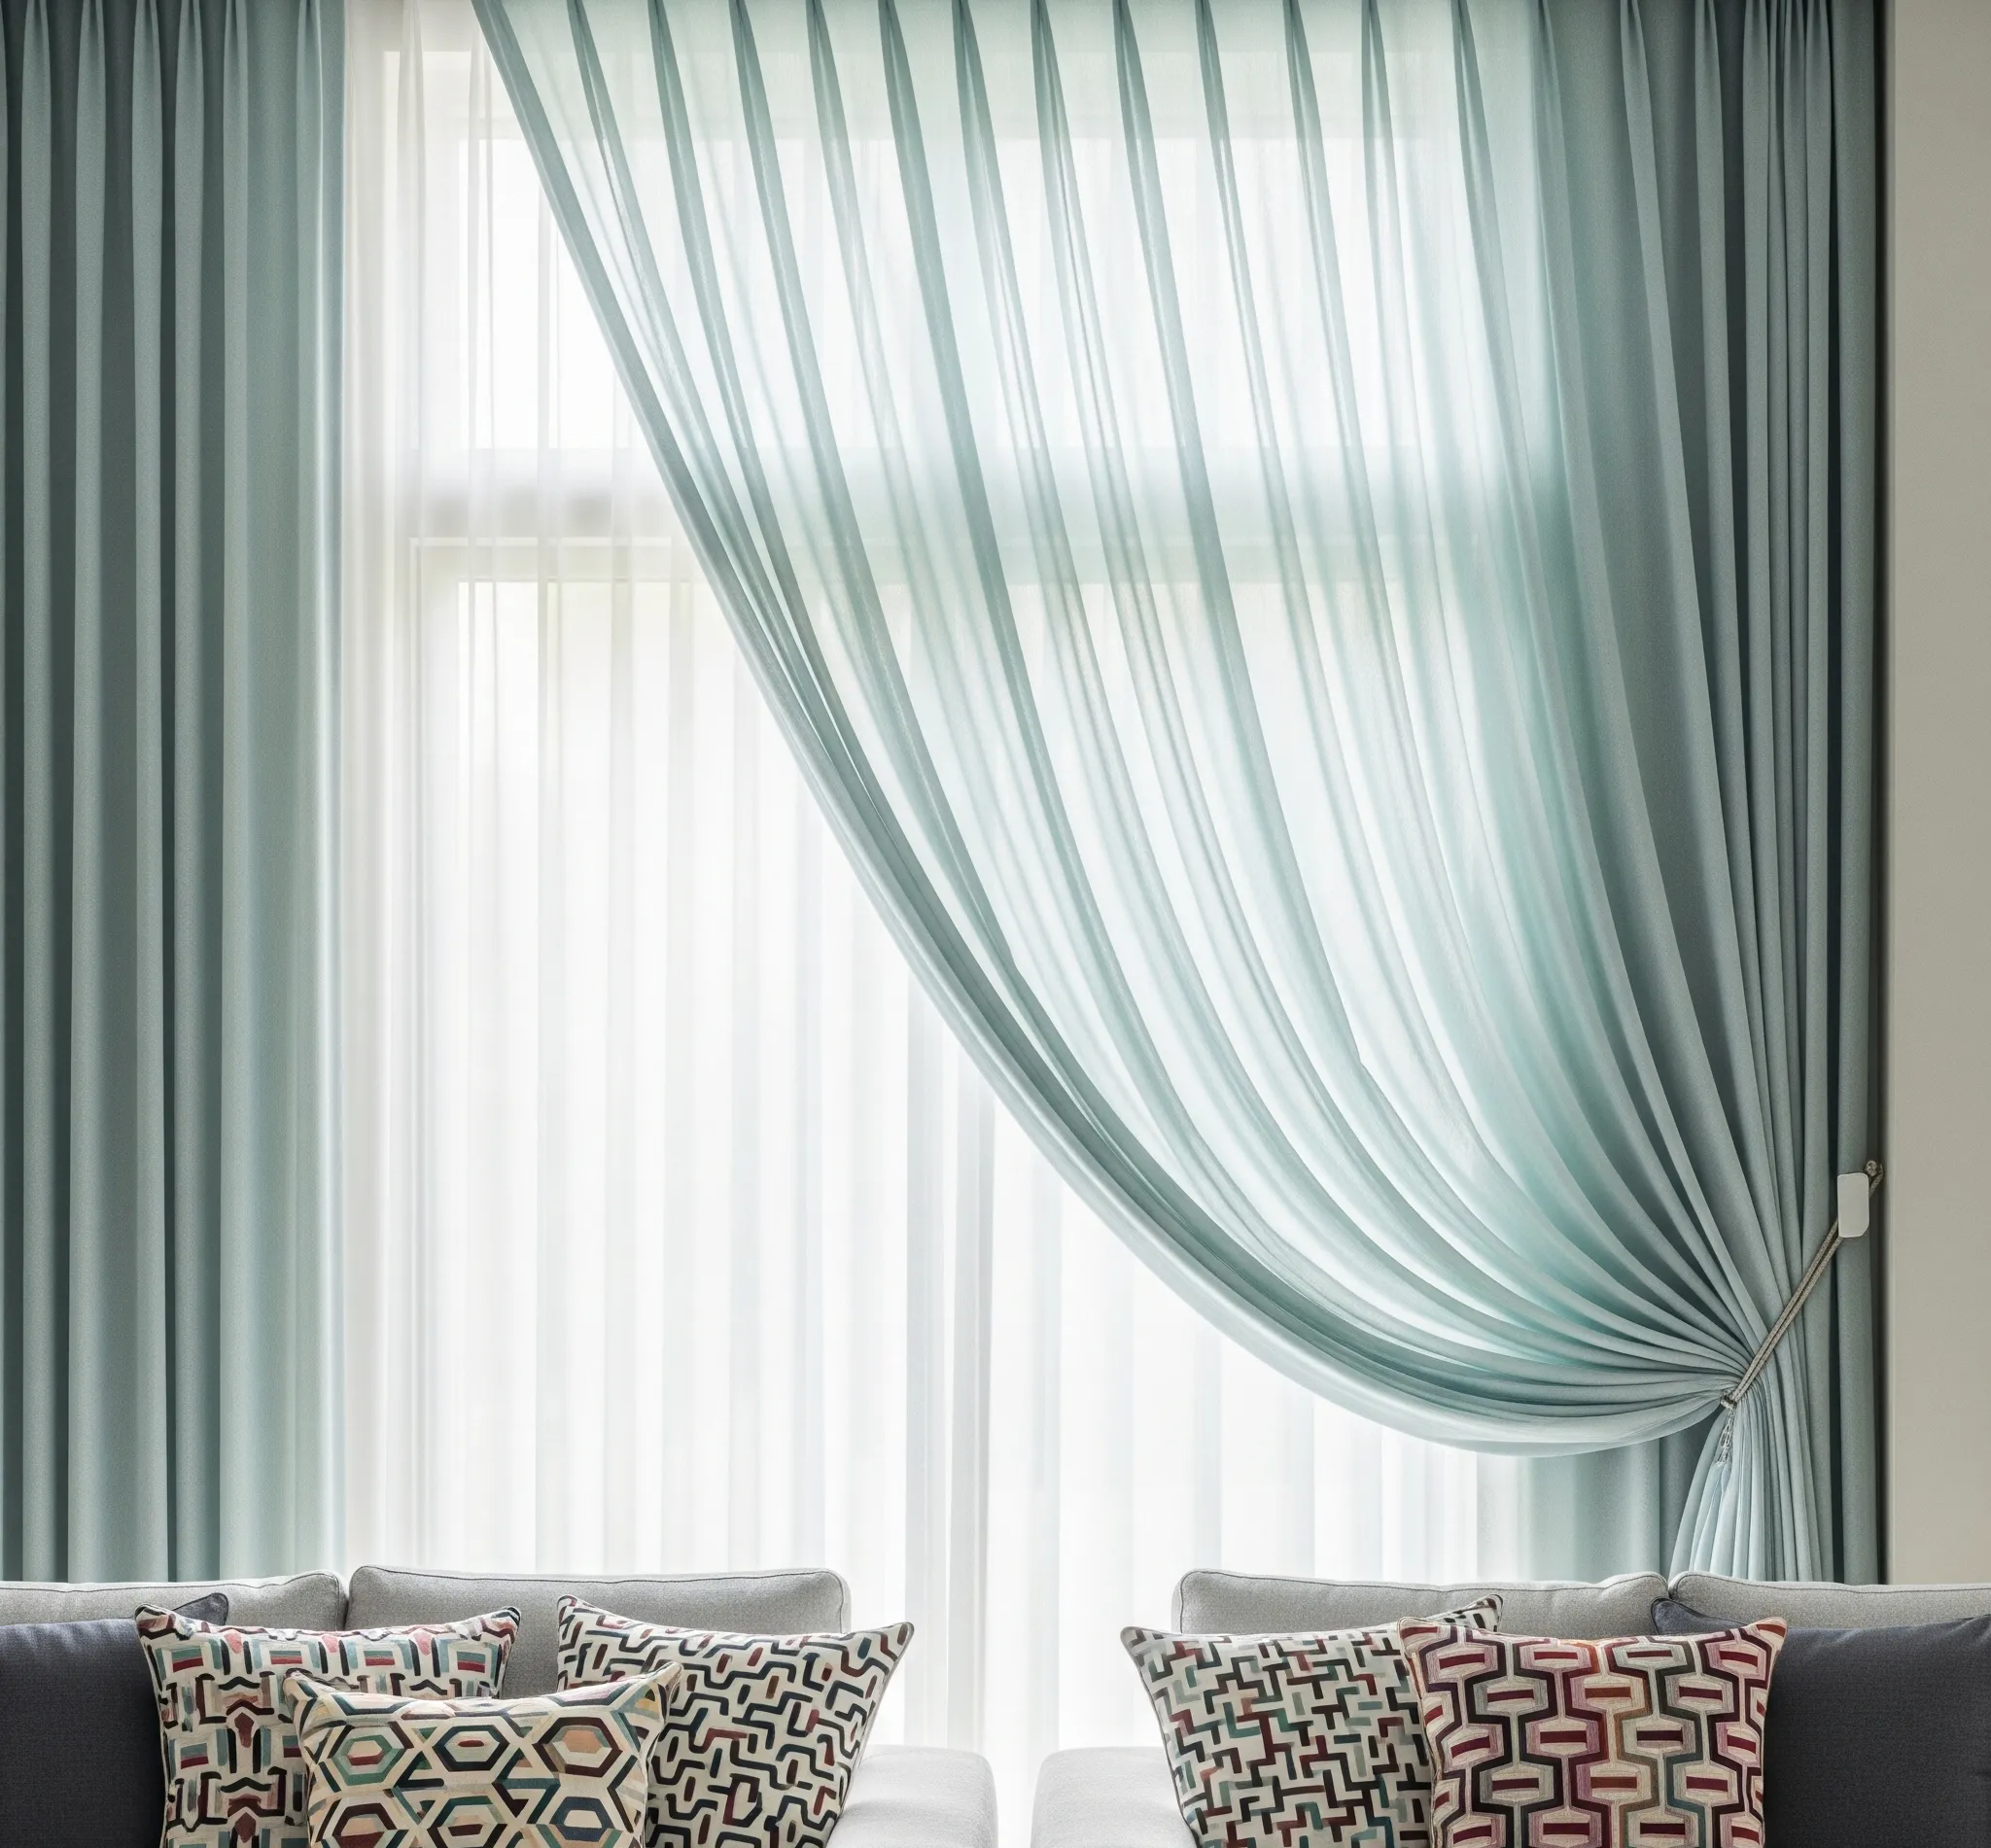
- Home Décor: Tie farmhouse fabric bows to the back of dining chairs for holiday dinners, use small velvet bows to hold back curtains, or use your stunning DIY wreath bow ideas to update your front door seasonally.
- Parties & Weddings: Tie small bows onto champagne flutes, use them as napkin rings, or create a stunning, oversized backdrop bow for a photo booth.
Getting That “Pinterest-Perfect” Look
It’s not just about the bow; it’s about the staging! To get those save-worthy photos:
- Pastel Flat Lays: Photograph your delicate hair bows or paper bows on a clean, simple background like a pastel blanket or a white marble countertop.
- Holiday Scenes: Place your chunky Christmas or fall bows next to seasonal items like pine boughs, twinkling lights, or a cup of hot cocoa.
- Use Natural Light: Always stage your photos near a window for the best light. Your bows deserve to sparkle!
Conclusion
Well, look at you! You started this feeling like bow-making was an impossible task, and now you have the skills to create a perfect little knot from a single piece of ribbon or craft an epic, multi-layered fluffy bow for your front door. We’ve covered how to make a bow with ribbon, learned the secrets of a crisp paper bow, and even tackled the textured beauty of a fabric design. That’s a whole lot of loop knowledge!
Now it’s your turn. Go grab that spool of ribbon you’ve been hoarding—I know you have one—and just start folding. Don’t worry about perfection on the first try, because honestly, I still occasionally end up with a bow that looks like a drunken spider tried to knit a beanie. Just start crafting and practice your fluffing technique!
I’d love to see what you create! Tag your creations on social media, or if you want to keep perfecting your symmetry, grab my free printable bow size chart that shows you exactly what ribbon length you need for different bow sizes. You can find the download link right below!
Remember, a little bow can make anything feel special. Now go make the world a prettier place!
